
When I first started scrapbooking, I was all about paper…until I learned all about stamping. Let me just say first that I know how confusing it can be in the beginning. Hopefully this will help explain a few things. (^_^)v
スクラップブッキングを始めた時、スタンプのことを知るまではただ紙に夢中になってました。最初はすごく難しいと思います。ここは少し分かりやすく話します。
There are different types of stamps, a ton of inks, and many stamping techniques. Just remember – all you really need is a stamp you love, a pad of ink, and a base to stamp on. You’ll enjoy it every time!
さまざまなスタンプやインクやテクニックがあります。ただ一つ覚えておいてください。必要なものはたった一個の好きなスタンプとインクです。それがあれば、毎回楽しい時間を過ごせます!
First, we’ll talk about stamps. There are rubber stamps and clear stamps (polymer or acrylic based). Rubber stamps can give a great image, but give you less visibility in seeing what you are stamping. Clear stamps allow you to see exactly where are stamping.
スタンプは二つのグループに分けましょう。ラバースタンプ(ゴム印)とクリアスタンプ(透明印)。ラバースタンプだったら、あまり位置がわかりにくいですが、すごく細かい画像が出来ます。

Wood-mounted rubber stamps come with and without foam. If they have the foam it will allow you to stamp nice because of the cushion. Otherwise you may need something under you base (a stamping pad, if you have it). If it’s on a block you will have to guess where you are stamping.
ウッドブロックのラバースタンプはフォーム有り無しの両方があります。スタンプする時、下にクッションがあればきれいに写せます。ブロックはイメージより大きいので、どこにスタンプするか完全にみえません。

Cling-mounted rubber stamps come with a foam layer between the rubber and a cling surface that will attach to a clear stamping block. You still can’t see exactly where you are stamping, but because the image outline is cut out, you have a more accurate idea where the stamp is going.
クリングマウントスタンプはラバーもフォームも一緒、ウッドブロックじゃなくくっつきやすい面がついてます。ウッドブロックより見やすいので、アクリルブロックにつけると使いやすいです。

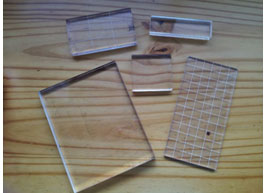
Clear stamps (made from polymer or commonly known as acrylic) are great because you can see exactly where you are stamping. They are relatively easy to clean depending on the ink.
クリアスタンプ(ポリマーかアクリル製)は透明なので、ぴったり押したい場所にスタンプが出来ます。インクによって、掃除もやりやすいです。
Stamping blocks come in all different shapes and sizes. Pick the one that is closest in size to your stamp for efficiency when stamping.
スタンプブロックは多くの形やサイズがあります。スタンプに一番近いサイズを選んで、簡単にスタンプ出来ます。
With all stamps, you may stain them with the ink. If you clean the stamps soon after you use them, it’s less likely to happen. I use non-alcohol baby wipes, just to be safe. But some inks like Staz-on should be removed with a stamp cleaner (Staz On has a remover of their own).
インクを使うと、汚れや着色される可能性があります。クリーナーで早めに拭けば、大丈夫です。私はノンアルコールのウエットティシュを使っています。例えばStazOn製を使えば便利です。
Steps for Stamping: スタンプのやり方:
1. Choose your stamp. If it is a clear stamp, attach it to an acrylic block.
スタンプを選んで、クリアスタンプの場合はブロックに付けます。

2. Ink the stamp by pressing it firmly on the pad. Ensure the entire stamp surface is covered. (For bigger stamps, lay the stamp down faced up and touch your pad to the stamp.) 強くインクパッドに押して。インクがしっかりついているかチェックしてください。

3.If you are using the stamp for the first time or an ink for the first time (or just to be safe) do a test-run to check. If your stamp has good ink coverage, you’re ready. If not, re-ink and test until ready. 新しいスタンプやインクは念のため、使用する前にテストしてください。

4. Press gently, but firmly on the area you are stamping. Rub over the entire back of the stamp without moving it. Very carefully lift the stamp directly up to avoid any smudging. (If necessary, retouch if you are using a clear stamp.) ゆっくり強くスタンプを押します。動かさずにまっすぐ上にあげます。(クリアスタンプの場合はもう一度やり直しできます。)

*Remember, different stamps and inks provide a new look – so have fun experimenting. いろんな色のインクを使って試してみて下さい。
Inks インク
Here are some commonly used inks: これはよく使用されるインクです。
Tim Holtz Distress Ink is good for aging your projects and giving them a worn look. They are water-based and can be spritzed with water to get them to blend, spread and just give a different look.
ティム・ホルツのディストレスインクは紙をわざと古く見せたり、汚したり、ビンテージ風にしたりするときに使用します。水性インクなので水をかけるとほどよくにじませる事ができます。
Memento Ink is a fade-resistant ink. It should be used when colouring images with markers etc. because it will not bleed. メメントインクは耐光性・耐水性の水性インクです。早く乾かしたい時やコピックマーカーを使うときはメメントインクをお勧めします。
Staz-On ink is a fast-drying, all-surface ink. It takes well to rubber stamps, but will not work well with some acrylic stamps. It is a solvent ink, which makes the stamp harder to clean. You need to use a stamp cleaner. It also comes in Opaque which stamps a solid colour, like cotton white.
ステイズオンインクまたはステイズオンオペークは吸収しない物でほとんど素材に使えるオールマウントと言うインクです。使用後、必ず早くスタンプクリーナーで拭いてください。
Brilliance ink is pigment-based and gives a vivid image when stamped. Because it is pigment-based, it will easily smudge so take extra care.
ブリリアンスインクはパール顔料系インク。乾燥時間はちょっとかかるので、にじむのを注意してください。
VersaMark is a watermark stamp pad. When stamped with Versamark, the image will be translucent and is great for background designs. It can also be used as an embossing ink or as a primer to new stamps before stamping in another ink, ensure even coverage.
バーサマークは無色透明なインクです。スタンプした部分の紙の色が濃くなりダブルトーンになります。 エンボスのテクニックも使えます。乾燥時間はちょっとかかります。
VersaMagic is also pigment-based, but is a chalk ink. It requires a little drying time so be careful not to smudge.
バーサマッジックは不透明なチョークの顔料系インク。ゆっくり乾きます。
Embossing Ink, when stamped, leaves a clear image. Then pour embossing powder on top of the image and shake off the excess powder (put back in the bottle for next time). The powder should now be heated with a heat tool to cook it or melt it to get a professional look. Embossing provides a nice texture to any project.
エンボスインクを使ったら、無色透明な画像が出来ます。その上に、エンボスパウダーをかけてヒートガンで溶かします。買った製品みたいに、きれいな作品が自宅でできるので楽しいです。
The Essential Glue Pad is not an ink, but an adhesive for glitter or flock. Simply stamp on the pad and then onto the paper. Add glitter or flock. Leave until dry and remove the excess (putting back into the bottle).
インクではないですが、エッセンシャル・グル―パッドはインクパッドの形のようにラメやフロックパウダーと使用します。普通にパッドに押して、スタンプしてラメやフロックを振りかけます。グル―を乾かしてその後、余ったパウダーをボトルに戻します。
Tips: インクのコツ:
l Store ink upside-down so the ink is at the top of the pad and ready for stamping. Your ink will go a lot farther. インクをさかさまにしておいておくと、長く使えるように出来ます。
l Use make-up sponge and a butterfly clip for inking and distressing. It’s cheap and easy to use. クリップをメイクのスポンジに付けて使うと、ディストレスする時に安あがりで使いやすくなります。
Always do a test before stamping or inking on a project – it’ll save you from making a mistake you’ll regret. 作品に使う前に常にテストして、失敗や後悔を避けましょう。
Steps for Embossing with a Heat Tool:
ヒートツールでエンボスのやり方:
1.Stamp on a watermark or embossing pad. Ensure good coverage. エンボスパッドでスタンプをきちんと押して。

2.Stamp gently onto your area to be embossed. Be careful not to move the stamp, as it might be slippery with embossing ink. エンボスインクを付けたら、滑りやすいのでゆっくりスタンプしてください。

3. Pour embossing powder over the area to be embossed. More is better! You can put the extra back into the container later. エンボスポウダーを前面に振りかけて。いっぱいかけたら、後でまた戻せます。

4. Pour off the excess powder. Tap the back to remove any remaining powder. (You can also use a small paintbrush to take off an excess.) 裏面に指でタップして。余ったパウダーを落とします。(絵の具のブラシを使ってもかまいません。)

5. Using an embossing tool, heat the image. You can see the powder start to melt and change texture (it might take a minute for the heat tool to warm up first). Don’t heat in the same place too long or it will burn. ヒートガンをかけます。パウダーは溶けるので同じ場所に長く当てると、焦げるので気をつけましょう。

Here’s the finished embossed image:

0 件のコメント:
コメントを投稿